Watch: add and save a report
A step-by-step guide using real Report Studio screens from a fictional demo site. Follow the same Community Bridge sample report from creation, cover selection and text review to its saved card, reader and download action. Choose a free Classic, Minimal or Editorial cover design, or upload your own custom cover image. Impact Reports is already installed; the sample PDF is already in Wix Media Manager. Installation and page publishing are explained below.
Use full screen to see the controls clearly. Pause whenever you need to follow a step.
Download the video · Download captions
Read the video transcript
- Hi, let's add your first impact report. We'll choose a document, check its text, and save it.
- This demo already has Impact Reports installed. Open Report Studio from your Wix dashboard to follow along.
- Choose Edit Organization. Add your name, website, and a short introduction. Choose your logo with the image selector.
- Open Manage Reports, then Add Report. Give it a clear title and year and a short summary of what's inside.
- Choose Upload or choose PDF or DOCX. Wix Media Manager opens. Upload a new file or select one you already have.
- Select your document, then choose Add to Page. The app brings the document link back to your report.
- The app prepares readable text. Check names, numbers, and reading order against your original. Correct anything that is wrong.
- Choose a free cover design or select Choose Image to upload your own. You can give every report its own cover.
- When the draft is right, choose Use Reviewed Text. Close the report editor, then choose Save at the top.
- Wait for the saved confirmation. Your connected widgets use these saved settings when they next load.
- For your first setup, add the widget in the Wix editor and publish. Then check the reader and download on your live page.
- Here is the Community Bridge report we just added. Open it to read the document, then use download to save a copy.
Install and open Report Studio
- Open Impact Reports in the Wix App Market. Add it to the correct Wix site.
- Open the site’s dashboard → Apps → Report Studio. In the Wix editor, add or position the Impact Reports widget on the page where you want your library.
- For an existing installation, use Apps → Manage Apps to approve an available update. Review the permissions and Wix’s update terms. Donation checkout attribution requires Manage Orders and Manage Donation Campaigns.
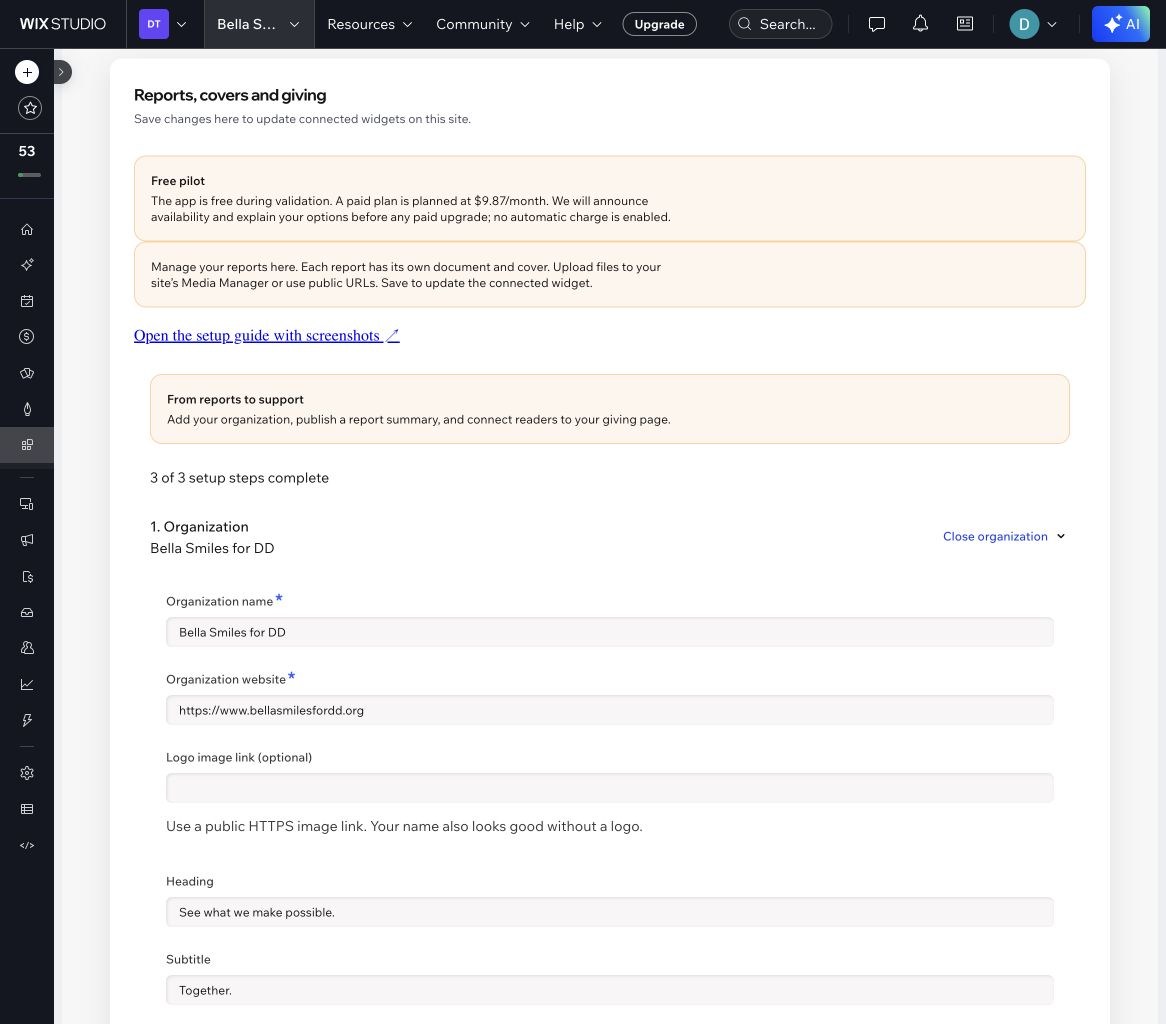
- Under Organization, add your name, website and introduction. Replace sample information before publishing.
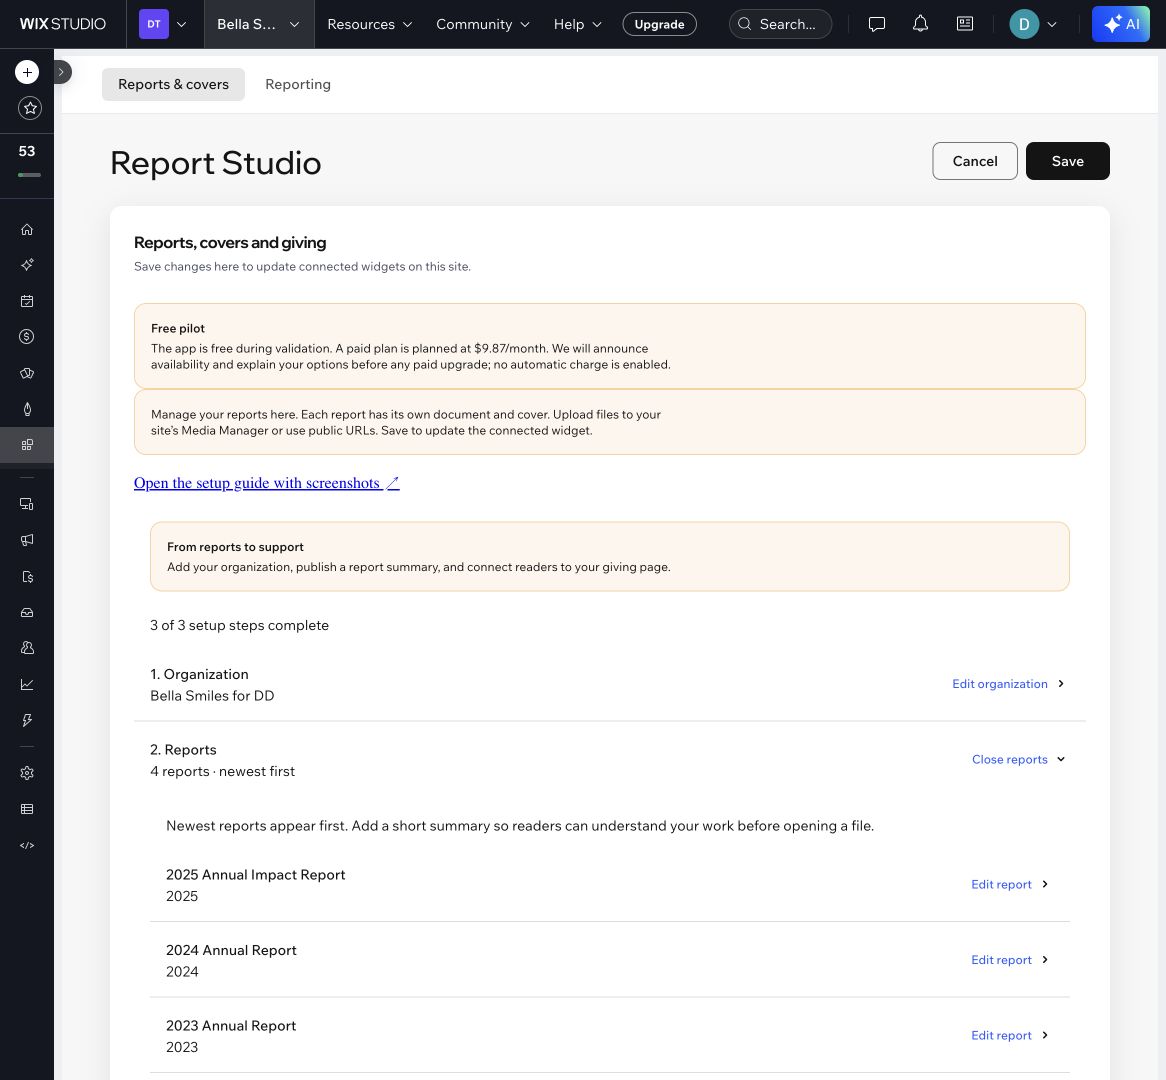
The free pilot does not automatically charge your site. A future paid plan is planned at $9.87/month; availability and upgrade choices will be announced.
Add reports and choose their covers
- Choose Manage reports → Add report, or Edit report for an existing item.
- Enter its title, year and a short, factual summary. Reports appear newest first.
- Choose Upload or choose PDF / DOCX. The site’s Media Manager lets you upload a document or select an existing one. Alternatively, paste a public HTTPS document URL.
- Under Cover design, choose a free Classic, Minimal or Editorial design. To use your own custom cover, select Choose image under Report cover and upload or select an image in Wix Media Manager. Each report can have its own cover. Set image fit and add a useful cover description.
- In the Wix editor, select Impact Reports and choose Design. Use Design element to choose Buttons, Section heading, Body text, Spacing, Section background or Report cards. Native Wix color pickers, font selectors and pixel sliders let you match your site. Changes save automatically and update the preview; publish your site when ready. Dashboard Appearance sets shared library defaults. Share remains a secondary action.
- Save. Connected widgets load the saved settings when opened again.
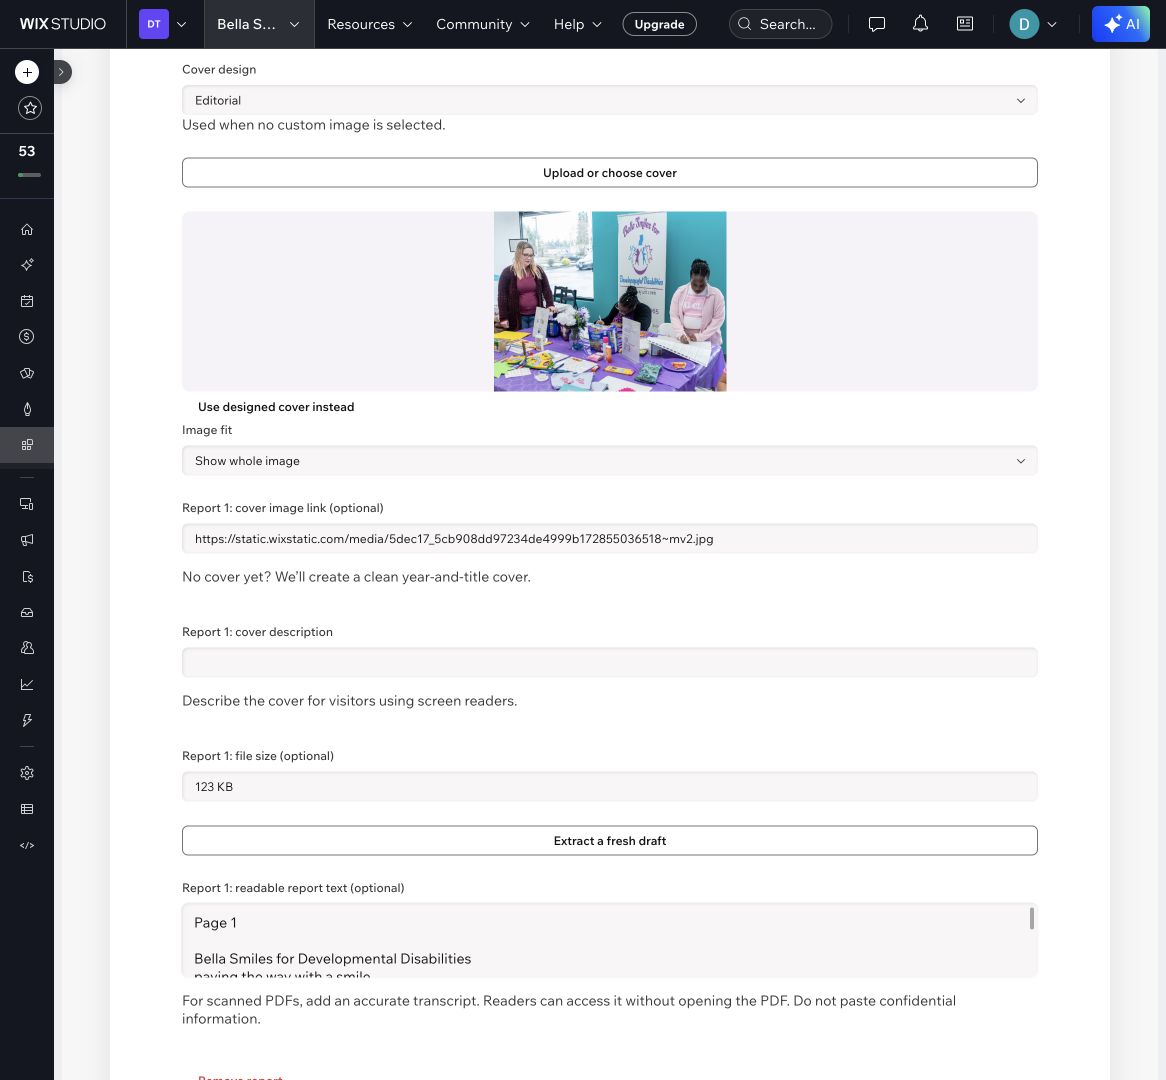
A public URL must return the actual PDF or DOCX, not a login page or a sharing page. Large files take longer to load; compress them before uploading where practical.
Choose how visitors browse your reports
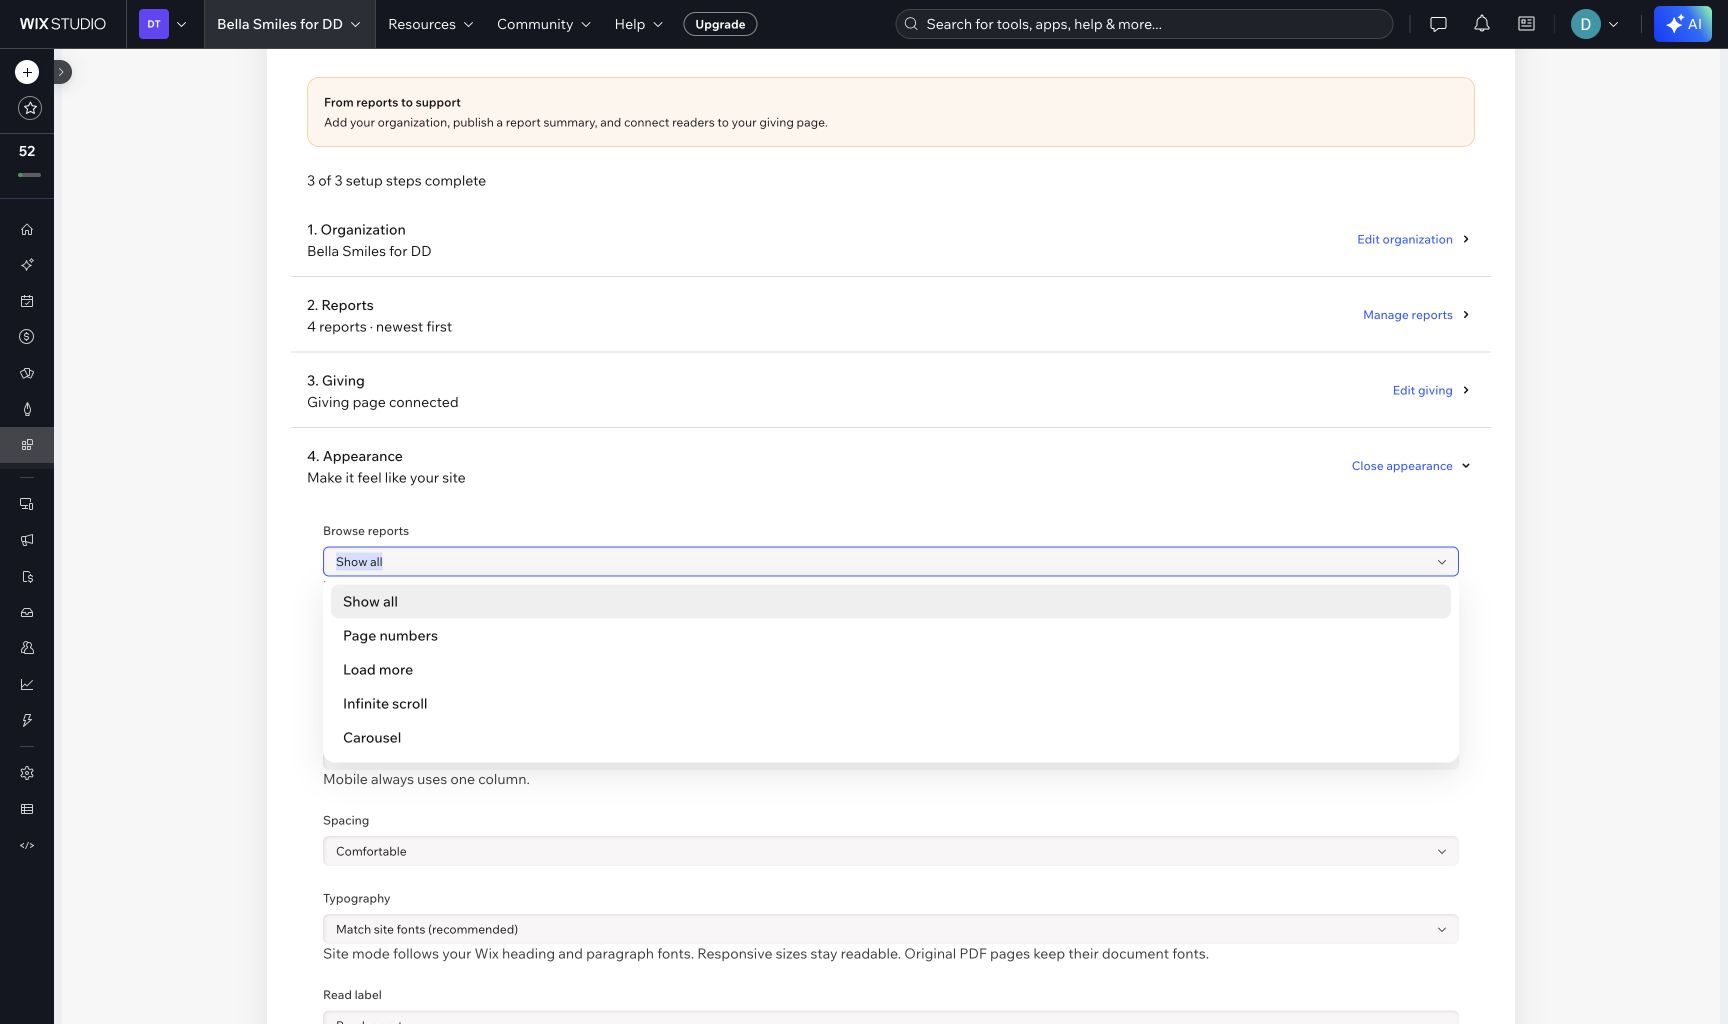
- Open Report Studio → Appearance → Browse reports.
- Choose page numbers, load more, infinite scroll or carousel. Choose the number of reports per page. Small libraries can show all reports.
- Enable Public HTML report pages for a separate archive and individual report URLs. Large libraries require this setting.
- Save, publish your Wix page, and open the public library to check Next, Previous and individual report links.
Each public archive segment has its own URL, canonical and reviewed text in the server response. Load more and infinite scroll preserve real page links so crawlers can follow the library without clicking buttons. Infinite scroll pauses after two automatic loads; carousel does not autoplay.
The Wix widget can be a page section or the main content of a Reports page. Its native HTML belongs to that Wix page. Separate report and archive page URLs are hosted by the app. Large libraries include the first segment in Wix HTML and links to the remaining archive.
Up to 1,000 reports are supported, with a 450 KB limit per stored report and 16 MB of total reviewed content. Wix storage quotas also apply. Keep your Wix page indexable and linked from your site. Crawling, indexing, ranking and AI citations remain decisions made by each service.
Help people discover and understand your impact
Reviewed report text can help search engines and AI tools understand your work. The current native Wix widget supplies that text for crawler HTML from the same saved library visitors read.
- Under Organization, keep Automatically prepare readable text enabled. Selecting a document prepares a draft; use Extract readable text (or Extract a fresh draft when reviewed text already exists) for existing reports.
- Choose the correct scanned document language. PDF text is extracted where available; scanned PDF pages use browser OCR. Images inside Word files need supplied text.
- Review names, numbers and reading order against the original, correct the draft, choose Use reviewed text and Save. Unreviewed drafts are not published.
- Add the current native Impact Reports widget to the intended Wix page and publish. Native crawler text uses your saved reports without adding Velo code or custom embeds. Recheck after report updates.
- Set Page to share to your published report page so shared links take people back to the designed reader.
Crawler HTML was verified on Bella Smiles for DD with HTTP requests using simulated Googlebot and GPTBot headers. This verifies returned text, not actual crawler visits, indexing, rankings or AI recommendations. Ordinary browser source may differ. Visitors get the designed reader when it loads.
Optional companion library
Public HTML report pages enables a separate library hosted by the app. It is optional and has its own URL; it is not the control that enables native text on your Wix page.
People follow report links to your site’s reader. The app-hosted library and individual report pages keep reviewed text available in expandable sections even when the designed reader loads.
Connect a giving page or report checkout
Start with a public donation-page link under Giving. To link supported Wix checkouts to reports, use the Wix checkout option in the updated app. Confirm completed payments separately in Reporting.
- Install Wix Donations and prepare a collecting campaign with your preferred donation frequencies. Configure the site’s payment provider and any Wix plan needed to accept payments.
- Approve the app update with Manage Orders and Manage Donation Campaigns. These scopes are broader than the app’s stored attribution data.
- Open Giving → enable Wix donation checkout with report attribution → Find Wix donation campaigns. Select the campaign and Save.
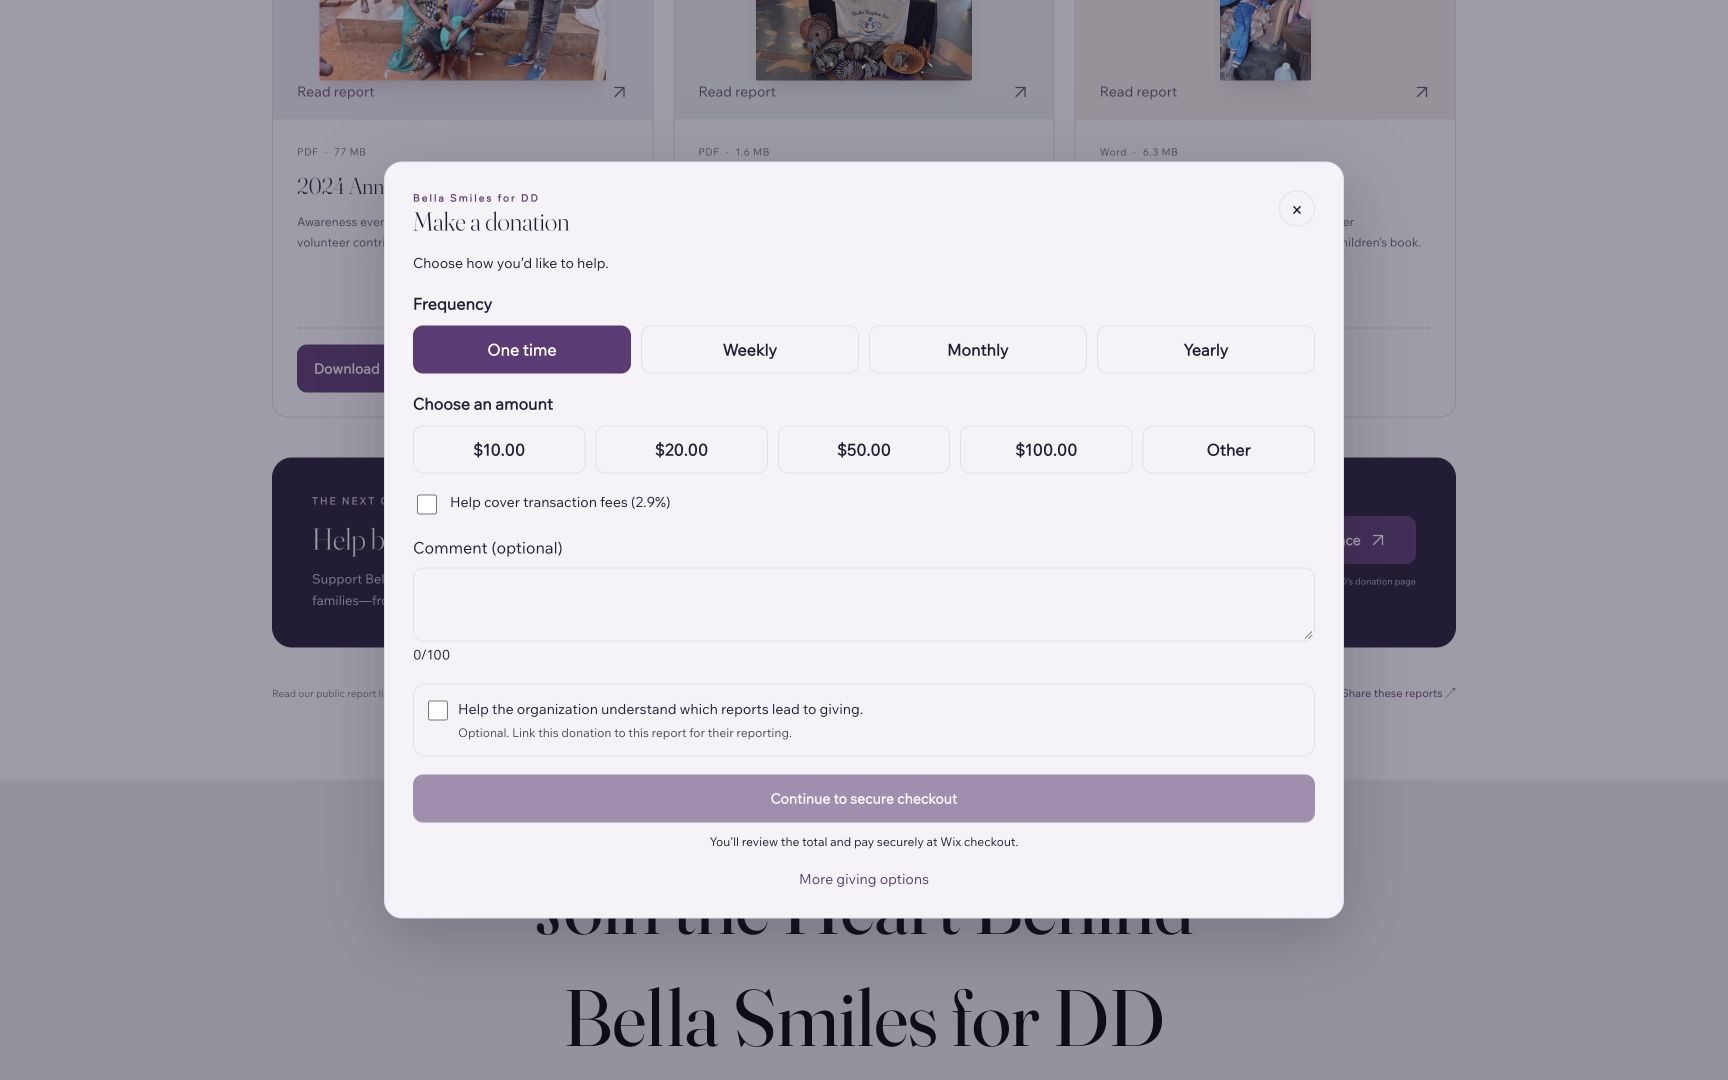
- Keep your ordinary giving-page link as an alternative. Amounts, custom limits, one-time/weekly/monthly/yearly choices, fee coverage and comments come from the selected campaign. Comments are submitted as Wix checkout order notes, not stored by Impact Reports. Customize the popup heading, introduction, button labels, selected color, background, corners, selector shape and spacing under Giving → Donation popup. Fonts and button styling use the app’s site-style controls. Available options depend on the campaign and payment provider; these controls do not change Wix’s final checkout.
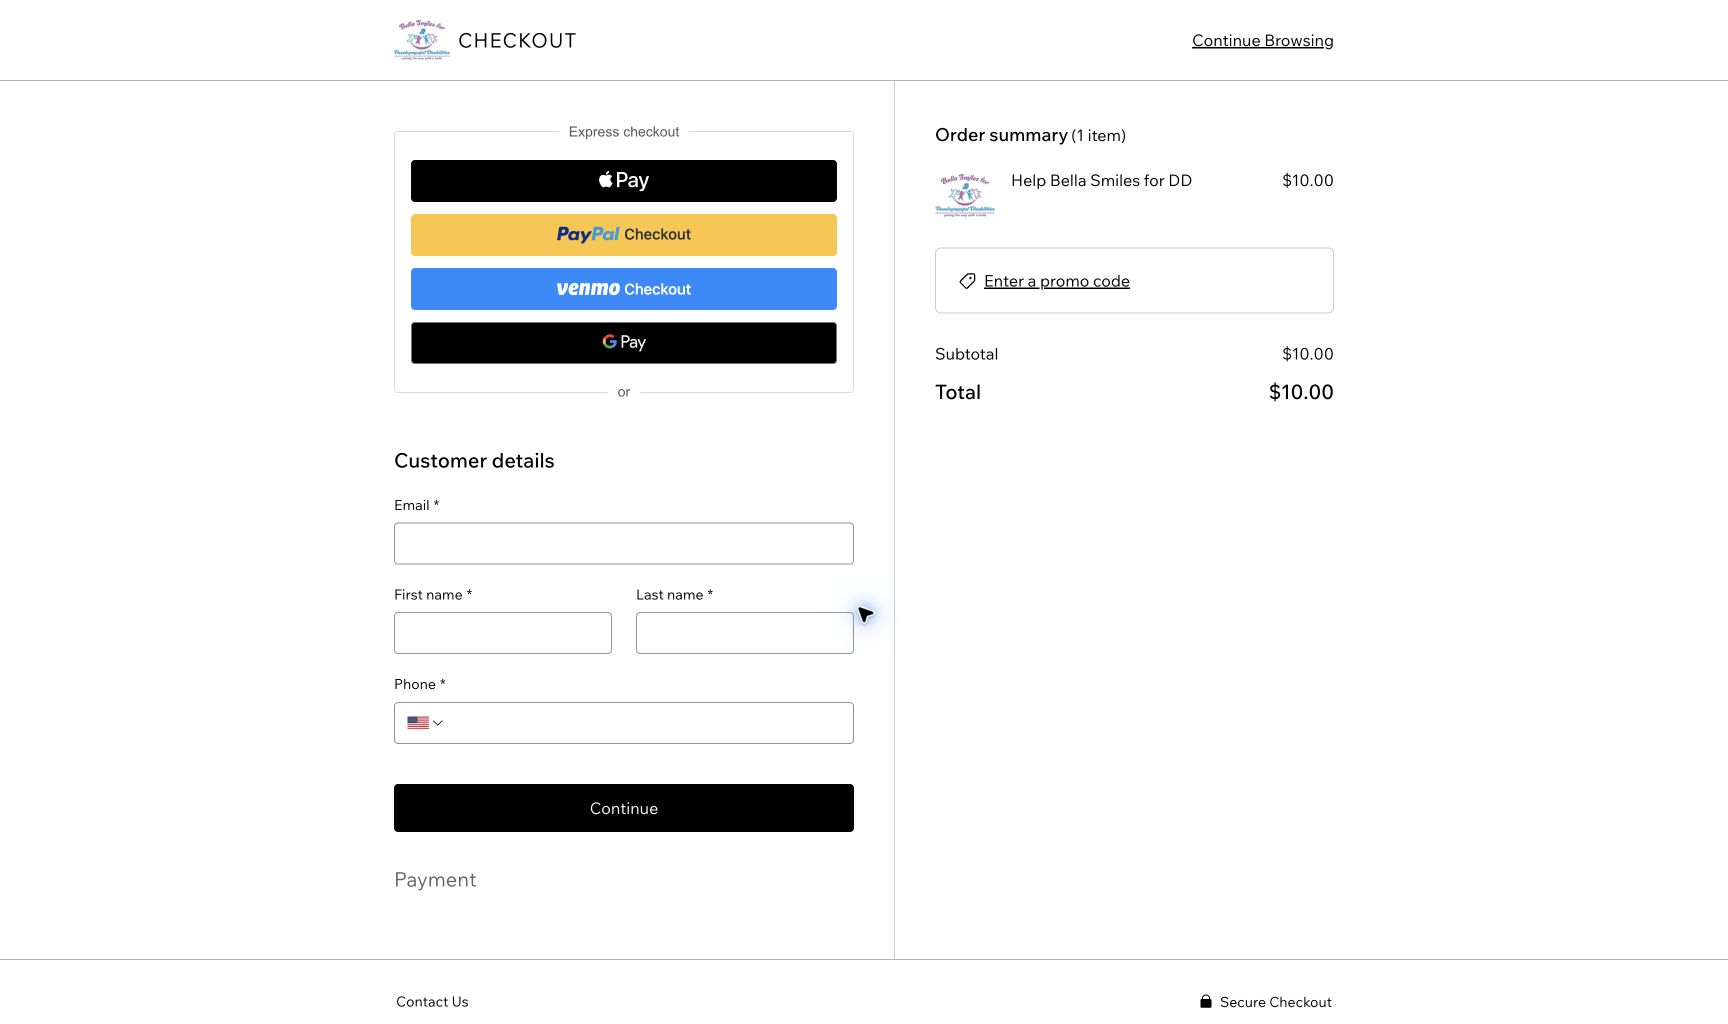
- In the published Wix widget, a reader chooses a campaign amount or Other. Linking the gift to the report is optional. Continue to secure checkout opens Wix’s payment flow.
- When the reader opts in, the app records the report and checkout reference before redirecting. Wix handles the payment. The app does not charge or refund payments itself.
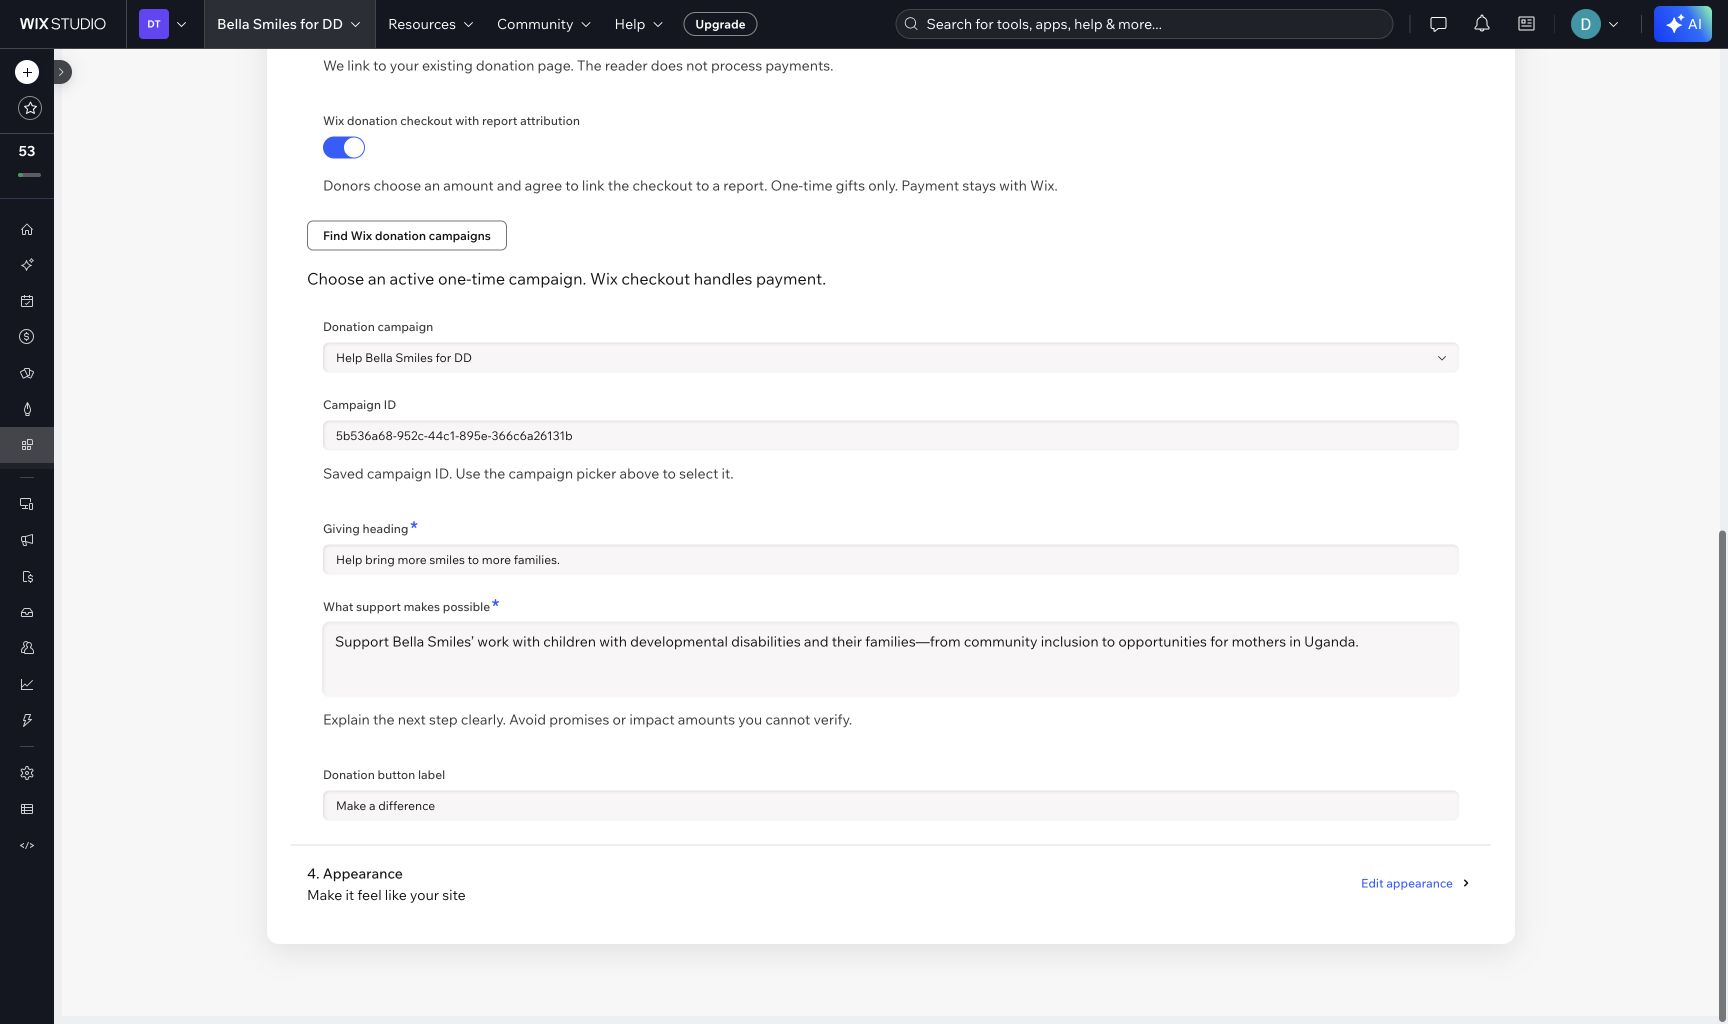
Attribution covers consented checkouts started inside the Wix widget, including the initial recurring checkout. Standalone public-reader links, ordinary donation-page links and recurring renewals are not matched to completed gifts.
Publish and check the visitor experience
- Save Report Studio settings, then publish the Wix page after positioning the widget.
- Open the published site on desktop and mobile. Check every report cover, reader, close action, download, share link and giving link.
- Use the site’s cookie/analytics consent controls. Declining analytics should exclude engagement observations. Attribution consent is a separate, explicit checkout choice.
- For an attribution test, open a report, start a supported checkout and confirm that it reaches Wix checkout with the right amount and campaign. An abandoned checkout must not count as a donation.
- A site owner must complete an authorized test or real payment through Wix. Then use Reporting → Verify report donations. Compare the result with Wix’s order/payment record. Test a provider-supported refund separately, and verify again.
Reaching checkout alone does not verify a completed donation. Payment verification must be exercised with an actual provider-approved transaction before treating the integration as fully validated on a site.
Learn what readers do next
Open the Reporting tab. Choose the period and report, refresh engagement, and use Verify report donations to query current order/payment records. Export the donation CSV for further review.
| Measure | What it means |
|---|---|
| Loaded, downloads, shares, giving clicks | Consented actions, not unique people or completed payments. |
| Confirmed gross | Approved payment records matched to the app-created checkout. Pending, authorized-only and offline entries are excluded. |
| Refunded / Net | Successful refunds and remaining amount. Verify again to refresh. |
| Wix Donations campaign totals | Lifetime site-wide totals, separate from report attribution. |
For donation attribution, the period filters when checkout began, not when payment finished. The latest 100 matching checkouts are checked; use a shorter period or one report if the limit warning appears. Unverifiable records are flagged and excluded. Each order is counted once. Different currencies remain separate.
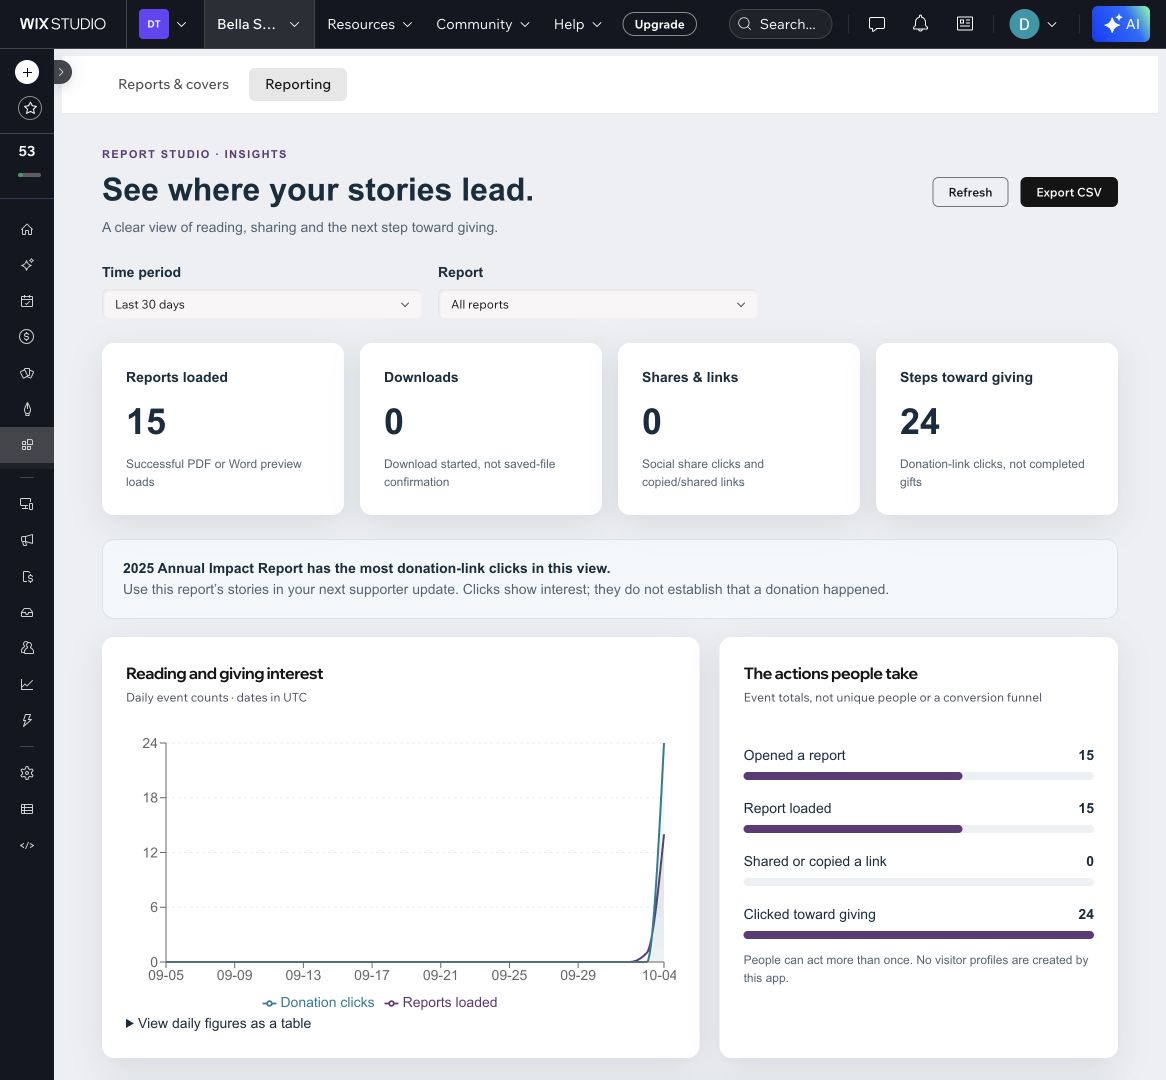
Verification is manual in this release. It does not use automatic payment webhooks. Attribution identifies a giving path; it does not prove the report caused the gift.
Open Wix Analytics from Reporting to check your site analytics. External marketing integrations are optional; the app cannot reliably detect their connection status or change visitor consent.
If something doesn’t work
- No campaigns: Check Wix Donations, supported frequencies, collecting status, app update permissions and dashboard access.
- Checkout unavailable: Check saved campaign, supported amount, payment-provider configuration and published site. Use the ordinary giving link while troubleshooting.
- Reader failed: Confirm the document URL is public and returns a supported file. Review readable text so it can provide a fallback.
- No attributed donation: Confirm the checkout started from the Wix widget with attribution consent, the payment was approved, and the filter includes its start date. Ordinary giving links are not matched.
- Incomplete figures: Retry verification and review the permissions or limit warning. Compare with Wix’s payment record before making financial decisions.
Contact dev@jitpomi.com with the page URL and a description. Please don’t send passwords, access tokens or donor payment details.
Choose your presentation
In Report Studio → Appearance, choose Editorial cards or Image stories, and an Editorial or Spotlight featured story. Customize navigation buttons, labels, alignment and carousel width, arrows, indicators and next-card peek. Image stories crop covers; Editorial suits covers whose full composition matters. Motion respects reduced-motion preferences and carousels never autoplay.
Measure discovery
Reporting includes consented archive-control actions alongside reading, downloads, sharing and steps toward giving. These are interaction counts, not unique visitors or proof of conversion. Swipe-only movements are not counted. App-hosted standalone readers do not currently forward analytics.
Match your brand and help more people read
Use the available typography, text size, color, background, spacing, button and corner controls to match your site. Add accurate cover descriptions and choose the content language; this is separate from the language used for scanned-document OCR. Check custom-color contrast warnings and test your published page with a keyboard.
The current release improves contrast, visible focus, accessible action names and focus after browsing updates. On app-hosted library and report pages, reviewed text stays available in expandable sections after the reader loads. Visitors can use it alongside the original document.
Full WCAG 2.2 AA conformance has not yet been established. Review the source PDF or Word document separately, and test your complete Wix page and checkout. OCR can misread text and does not make the original document accessible.